Skip to content

The Jo Burg

Get enough knowledge to shine

Menu
  • Home
  • Shopping
  • Home
  • Contact Here
Menu

Category: Home

The Seasonal Window-Cleaning Schedule Most Homeowners Wish They’d Started Sooner

Posted on April 18, 2026April 13, 2026 by Ed Miller

Window cleaning doesn’t have to be a panicked Saturday spent chasing streaks while the sun bakes soap onto the glass.

A seasonal cadence, done on purpose, keeps grime thin, predictable, and easy to remove. And the weird bonus? Your house looks “maintained” even when the rest of life isn’t.


 The real problem: you’re cleaning too late

Most people don’t have a window-cleaning problem. They have a timing problem.

When you wait until the glass looks terrible, you’re not cleaning anymore, you’re restoring. That’s when you scrub harder, re-wipe edges, fight mineral spots, and burn an hour just on tracks that should’ve taken five minutes.

Here’s the thing: windows get dirty in patterns. Pollen season. Summer dust and sprinkler mist. Fall debris. Winter film from condensation and heating. If you’ve ever wondered when is the best time to clean your windows, the answer usually comes down to matching the work to those patterns, and when you do, you win.


 The cadence (simple, not precious)

Forget a rigid calendar. Tie the work to seasons and add a tiny “maintenance heartbeat” so you’re never starting from zero.

Your rhythm:

– Daily/As-needed: quick spot-checks (fingerprints, dog nose art, kitchen splatter)

– Monthly: a rotating set of “overlooked” tasks (tracks, sills, one set of exterior panes)

– Seasonally: the bigger reset jobs that keep the whole system from slipping

That’s it. No gold star required.


 Spring: pollen is the enemy, screens are the battlefield

Spring cleaning is less about sparkle and more about containment. Pollen sticks to screens and frames, then gets dragged indoors every time you open a window or door.

Professional Window Cleaning

 Pollen prevention (before you touch the glass)

Walk the exterior perimeter first. I mean literally walk it. Look at:

– gaps in weatherstripping

– cracked caulk at trim joints

– screen corners that aren’t seated tightly

Seal the obvious leaks, because you can’t “clean” your way out of a drafty frame that’s constantly inviting dust inside.

Now, this won’t apply to everyone, but if you live near heavy landscaping or flowering shrubs, moving or trimming plants away from windows makes a noticeable difference. I’ve seen homes cut visible pollen buildup just by clearing a 12, 18 inch zone around lower windows.


 Screens: clean them like they matter (because they do)

Pull screens out. Inspect for tears. Then:

  1. Dry remove first: shake, brush, or vacuum (soft brush attachment)
  2. Wash: mild soap + lukewarm water, gentle sponge or soft brush
  3. Rinse thoroughly: leftover soap is a streak factory
  4. Dry fully: re-installing damp screens is how you end up with trapped grit and musty corners

If your screens are old aluminum and slightly oxidized, don’t go aggressive. You’ll grind oxidation into the mesh and it’ll look cloudy forever.


 Sills and stains

Painted sills handle mild all-purpose cleaners fine. Bare wood doesn’t. For wood interiors, use the least-wet method possible: damp microfiber, wipe along the grain, then dry immediately.

Stains that don’t budge? Test a gentle solvent in an inconspicuous spot (yes, it’s annoying, but repainting is more annoying).

One-line truth: Spring is where you prevent the whole year’s buildup.


 Summer: quick hits, glare, and condensation weirdness

Hot take: Summer is the easiest season to maintain windows and the hardest season to deep clean them well.

Why? Heat. Direct sun. Fast evaporation. That’s how you get streaks that “appear” after everything looked fine.

So summer is for shorter sessions. Earlier in the day. Shaded sides of the home first.


 Glare control (practical, not aesthetic)

Clean exterior glass on big, light-facing windows and trim back foliage that’s rubbing or shedding onto panes. Plants touching windows cause micro-scratches over time (especially when wind-driven dust gets involved).

If glare is a constant issue, window film can help, but it changes your maintenance slightly. Film tends to show edge residue and smudges faster, so you’ll want softer cloths and gentler products. No ammonia on many films. Read the manufacturer guidance or you’ll shorten its life.


 Condensation checks

Condensation on the interior in summer often points to:

– poor air circulation near windows

– seals starting to fail

– humidity spikes from cooking, showers, basements

Look closely at the bottom edge of frames and the corners. That’s where problems start. Replace worn gaskets if you can; otherwise, at least clean and keep the area dry so you’re not feeding mildew.


 Fall: the “seal and dust” season (unsexy, extremely effective)

Fall is when I get opinionated: if you skip fall, winter will punish you.

This is the season for tightening up the building envelope and knocking out interior dust zones that get worse once the heat kicks on.


 What actually matters in fall

– Inspect caulk lines and weatherstripping; repair obvious gaps

– Clean tracks and weep holes (those tiny drain channels) so water can escape

– Wipe blinds and ledges before you close windows for the season

Dust loves warm air currents. Once heating starts, you’ll see it settle on sills and lower panes like it’s paying rent.

Also, do a basic exterior visibility pass: trim shrubs, check exterior lighting, clear cobwebs from corners. Your windows will look cleaner just from better sightlines and less shadowy grime.


 Winter: streak-free cleaning and “don’t freeze your seals”

Winter window cleaning is about restraint. A little moisture, done carefully, beats soaking anything.

Use a gentle, ammonia-free cleaner and microfiber cloths. Work small sections. Dry immediately. If the glass is cold, even good cleaner can smear if you over-apply.

Look, don’t crank the heat to “surface of the sun” right before cleaning. Rapid temperature swings can stress seals, and condensation will undo your work anyway.


 One surprisingly useful stat

Indoor humidity is a big driver of winter condensation. ASHRAE guidance commonly targets ~30, 60% relative humidity for comfort in occupied buildings, with lower levels often needed in cold weather to reduce condensation risk. Source: ASHRAE thermal comfort and indoor environmental quality guidance (ASHRAE, Standards and Handbooks overview: https://www.ashrae.org/).

Translation: if your windows keep fogging up, cleaning is only half the fix.


 Tools that actually save time (not gimmicks)

You don’t need a closet of gadgets. You need three things that aren’t junk.

A good setup:

– Squeegee (quality rubber): the fastest path to streak-free glass

– Microfiber cloths (two types): one for washing, one for final drying/buffing

– Extension pole: reach upper panes without ladder gymnastics

Add a small detailing brush for frames/tracks if you want to feel like a pro (it helps). Keep a spray bottle with a mild solution and resist the urge to over-soap.

In my experience, most streak problems aren’t product problems. They’re “too much liquid + not enough drying cloth” problems.


 Build a bite-sized schedule you’ll stick with

If you try to “do all the windows” in one go, you’ll treat it like a once-a-year punishment. Instead, rotate.

Here’s a pattern that works in normal human life:

– Week A (20, 30 minutes): interior glass on the busiest windows

– Week B (20, 30 minutes): exterior glass on those same windows

– Once a month (15 minutes): tracks + sills on a small zone (kitchen, entry, living room)

That rotation keeps visibility high where you actually look, while slowly sweeping the whole house into shape.

One-line reminder: Momentum beats intensity.


 When the plan breaks (because it will)

If you fall behind, don’t “catch up” by doing everything. That’s how you quit again.

Do this instead:

– reset just the front-facing windows for curb appeal

– clean one room’s interior panes for morale

– handle tracks on the worst two windows (they cause half the mess)

And keep a small caddy ready to go. The time you waste hunting for a squeegee is the time your brain decides this task is annoying.

That’s the whole trick, honestly: make it easy enough that you don’t negotiate with yourself.

Read more

The Pressure Washing Jobs Worth Paying a Pro For (and the Ones You Can Knock Out on a Saturday)

Posted on March 30, 2026April 2, 2026 by Ed Miller

Pressure washing looks simple right up until it isn’t.

A good rinse turns into shredded wood fibers, etched concrete, water behind siding, or a tripped breaker because someone blasted the meter box like it was a patio chair.

So where’s the line between “DIY pride” and “call someone with insurance”?

Hot take: most people don’t need “more pressure.” They need more patience.

I’ve watched homeowners rent a 3,200 PSI unit and immediately reach for the red 0° tip like it’s a cheat code. It’s not. It’s a tiny water chisel.

Here’s the thing: if you’re asking What Is Pressure Washing?, cleaning power comes from a mix of PSI (pressure), GPM (flow), chemistry, and dwell time. Pros lean on flow and technique. DIYers tend to crank pressure because it feels productive.

The “Safe DIY” List (if you can follow directions)

If you can commit to testing a small area and you’re willing to stop when something feels off, you can handle plenty of exterior cleaning yourself.

Good DIY candidates

– Sidewalks and plain broom-finish concrete (no decorative overlay, no fresh pour, no failing sealer)

– Vinyl siding that’s firmly attached and not already brittle (use low pressure; rely on detergent)

– Composite decking that’s in good shape (wide fan tip, keep distance, don’t stripe it)

– Outdoor furniture, plastic bins, garage doors (easy wins)

– Fences *only if you accept* some fuzzing risk and you use a gentle approach

Short version: if the surface is tough, flat, low-to-the-ground, and not historically valuable, DIY is usually reasonable.

DIY technique, but not the fluff version

A few rules that actually prevent damage:

Use the lowest effective pressure.

If you can clean it at 1,500, 2,000 PSI, cleaning it at 3,000 PSI isn’t “better,” it’s just faster… until it isn’t.

Stand back. Then back up more.

Distance is your real pressure regulator. Start farther than you think you need, then creep in.

Keep the wand moving.

Pausing for even half a second is how you carve tiger stripes into wood and “engrave” concrete.

Don’t spray upward into laps and seams.

That’s how water gets behind siding, under trim, into soffits, and suddenly you’re researching mildew remediation at 11 p.m.

One more: detergents aren’t decoration. Let them dwell (but don’t let them dry).

A quick stat that should change how you think about this

Pressure Washing

Consumer-grade pressure washers often deliver 1.2, 2.0 GPM, while professional units commonly run 4+ GPM. That higher flow is a big reason pros can clean faster at lower pressure. The Pressure Washer Manufacturers’ Association (PWMA) even emphasizes comparing machines using Cleaning Units (CU = PSI × GPM) rather than PSI alone. Source: PWMA consumer guidance on pressure washer ratings and CU.

Translation: the pro’s machine isn’t just “stronger,” it’s *different*.

When you should hire a pro (because the downside is ugly)

Some jobs are risky even if you’re careful. Not because you’re incompetent, but because the materials, height, or consequences are unforgiving.

Call a professional when you’re dealing with:

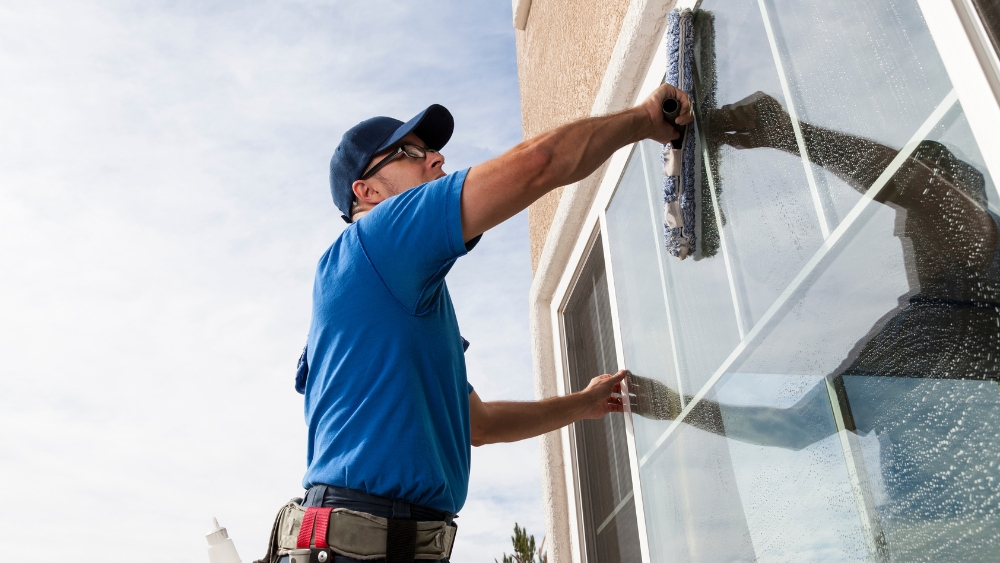
1) Height + water + ladders

Two-story siding, steep roofs, awkward dormers. If you’re on a ladder with a pressurized wand, you’re already in the danger zone (and I’m not being dramatic).

2) Roof cleaning

Most roofs shouldn’t be pressure washed at all. Asphalt shingles especially. Proper roof cleaning is typically low-pressure chemical application with controlled rinse, and overspray management is half the battle.

3) Old wood, soft brick, historic masonry

Aged substrates fail quietly. You won’t always see damage immediately; sometimes you “clean” it and accelerate deterioration.

4) Anything near electrical service

Meters, weather heads, service masts, exterior panels, outlets, lighting, doorbell transformers. Water intrusion here is the kind of problem that ruins your week.

5) Peeling paint or mystery coatings

If there’s a chance you’re disturbing old lead paint, you don’t want to freestyle it. Same story with unknown sealers that turn cloudy or strip unevenly.

6) Oil stains, rust, efflorescence that won’t quit

Stain removal often needs heat, specialty chemicals, agitation, or multiple controlled passes. The DIY approach is usually “more pressure,” which is how concrete ends up etched and still stained.

The real DIY vs. pro cost comparison (the part nobody wants to calculate)

DIY is cheaper on paper. Then the receipts happen.

– Rental unit: daily fee + deposit

– Detergent, pump protector, hoses, tips you didn’t know you needed

– Landscaping you accidentally nuked with overspray

– Time: setup, testing, moving furniture, cleanup, return trip

– The big one: damage risk

Now, this won’t apply to everyone, but if you’re the type to “push through” when the result looks uneven, you’re a prime candidate for costly rework. Pros aren’t magical. They’re just operating with better flow rates, surface-specific chemicals, and a lot more reps.

Also: insurance matters. If a contractor cracks a window seal or forces water behind a wall, there’s a process. If you do it, that process is called “paying for it.”

Gear talk: DIY machines vs. pro rigs (what’s actually different)

DIY machines can be fine. I’m not anti-consumer tools. I’m anti-expecting them to behave like commercial equipment.

Professional setups typically bring:

– higher, steadier GPM

– better pressure regulation and unloaders

– downstream or dedicated chemical systems

– surface cleaners that don’t leave zebra stripes

– hot water capability (for grease and gum)

– consistent maintenance and backup parts (which is boring… until it saves a job)

And yes, technique is huge. A mediocre washer in skilled hands beats a powerful washer used like a firehose.

Surfaces & hazards: what goes wrong fast

Concrete is “tough,” but it isn’t invincible. Blow out soft spots, carve control joints, shred failing sealer, expose aggregate, and you can’t un-do that.

Wood is worse. One bad pass and you’ve raised the grain so aggressively you basically signed yourself up for sanding. Composites can haze or stripe. Stucco can chip. Brick can erode at the mortar lines. Painted surfaces can peel in sheets (which feels satisfying until you realize you just created a prep job).

Look, pressure washing is removal. Sometimes you remove more than dirt.

A DIY-or-hire framework that doesn’t require a spreadsheet

The 60-second safety check

If any of these are true, pause:

– You need a ladder to reach the target area

– There are visible cracks, loose boards, failing mortar, peeling paint

– You’ll be spraying near electrical components or vents

– Runoff will flow into sensitive landscaping or a storm drain you can’t control

The “test patch” rule

Pick an inconspicuous spot.

Try the lowest reasonable pressure with a wide fan tip. If you see fuzzing, etching, striping, or water intrusion, that’s your answer.

The ego check (yes, really)

Ask yourself: *If this goes sideways, am I okay paying to fix it?*

If not, hire it out.

What you’re buying when you hire a pro

Not just “a guy with a washer.”

You’re paying for controlled workflow: pre-wet, chemical selection, dwell time, protection of plants, containment where needed, correct rinse technique, and a final inspection. A good company will also tell you what *not* to wash, which is honestly one of the biggest tells that they know what they’re doing.

And timing? Pros often finish in a fraction of the time because they’re not learning on your property.

Final thought (not a pep talk)

DIY pressure washing is great when the surface is forgiving and the stakes are low. When the surface is fragile, elevated, valuable, or close to electrical and water-sensitive areas, the smartest move is usually to pay for competence.

Clean is nice. Intact is nicer.

Read more

Comprehensive Restoration Solutions for Homes and Businesses after Damage or Disaster

Posted on December 16, 2025December 20, 2025 by Ed Miller

Disasters can strike at any time, leaving homes and businesses vulnerable to damage. Whether it is water, fire, mold, or storm-related issues, having access to comprehensive restoration solutions ensures that properties are restored efficiently and safely. Companies like DRYmedic North Palm Beach provide professional services designed to bring back peace of mind and full functionality to affected spaces.

Immediate Response for Maximum Protection

One of the most important aspects of disaster restoration is rapid response. Quick action can prevent further damage and save valuable property. Key steps often include:

  • Emergency assessment – Professionals evaluate the extent of damage immediately.
  • Containment measures – Preventing the spread of water, mold, or contaminants is crucial.
  • Temporary stabilization – Ensuring the property remains safe and secure while restoration begins.

Prompt response not only minimizes long-term damage but also helps reduce repair costs, giving homeowners and business owner’s peace of mind during stressful times.

Tailored Restoration Services

Every property and situation is unique, and comprehensive restoration solutions cater to these individual needs. Services typically cover:

  • Water damage restoration – From burst pipes to flooding, drying and dehumidification restore spaces efficiently.
  • Fire and smoke restoration – Cleaning, deodorizing, and repairing fire-affected areas to bring homes and businesses back to pre-loss condition.
  • Mold remediation – Identifying and removing mold to protect health and prevent recurrence.
  • Storm and disaster recovery – Handling structural damage and debris removal with precision.

By addressing all aspects of damage, restoration experts ensure that no detail is overlooked, creating a safer and healthier environment.

Advanced Technology and Expertise

Modern restoration relies on cutting-edge tools and techniques to speed up recovery and improve results. Advantages include:

  • State-of-the-art drying equipment – Reduces moisture quickly to prevent mold growth.
  • Air quality monitoring – Ensures the environment is safe and free from lingering contaminants.
  • Precision cleaning methods – Specialized equipment restores surfaces and materials efficiently.
  • Professional project management – Keeps the process organized, transparent, and stress-free.

These technologies, combined with skilled technicians, make restoration a seamless experience.

Benefits for Homes and Businesses

Investing in comprehensive restoration solutions has lasting benefits:

  • Restored property value – Ensures homes and businesses maintain their worth.
  • Enhanced safety – Eliminates hazards caused by water, mold, or fire damage.
  • Peace of mind – Reduces stress during challenging circumstances.
  • Long-term protection – Prevents recurring damage and prolongs the life of property.

In any disaster scenario, having reliable restoration services is key to recovering quickly and effectively. With the right team, damaged spaces can be transformed back into safe, functional, and beautiful environments.

Read more

Comfortable Condominium Interiors Support Relaxation and Focus

Posted on November 14, 2025November 19, 2025 by Ed Miller

A harmonious living environment where thoughtfully designed condominium interiors promote relaxation and focus, achieving an ideal balance of serenity and productivity. Thoughtful design elements, soothing color palettes, and practical layouts make these spaces ideal for both unwinding after a busy day and concentrating on personal or professional tasks.

Thoughtful Interior Design for Daily Comfort

  • Open Layouts: Spacious floor plans encourage a sense of freedom and reduce clutter, allowing residents to move effortlessly while maintaining an organized home.
  • Natural Light: Large windows maximize daylight, enhancing mood and creating a bright, airy atmosphere that naturally boosts focus.
  • Ergonomic Furniture: Chairs, sofas, and workspaces are designed for optimal comfort, supporting both relaxation and extended periods of concentration.

Calm and Inviting Atmosphere

  • Soothing Colors: Gentle tones like soft neutrals, warm creams, and subtle pastels create a calming environment that reduces stress and promotes mental clarity.
  • Textural Harmony: Smooth surfaces combined with cozy textiles, such as rugs and cushions; add warmth and tactile comfort to every room.
  • Personalized Spaces: Thoughtful placement of furnishings and decorative elements encourages residents to create a space that reflects their lifestyle and personality.

Productivity-Friendly Features

  • Dedicated Work Areas: Many condominium interiors include home offices or study nooks designed to enhance focus and efficiency without compromising comfort.
  • Smart Storage Solutions: Cleverly integrated storage keeps essentials organized, helping residents maintain a clean and distraction-free environment.
  • Quiet Corners: Designated quiet zones allow for meditation, reading, or concentration, ensuring residents can balance relaxation with productivity.

Wellness and Relaxation at Home

  • Soft Lighting: Adjustable lighting systems let residents set the perfect ambiance for any activity, from energizing work sessions to calming evenings.
  • Indoor Greenery: Strategically placed plants not only improve air quality but also provide a soothing connection to nature.
  • Comfort-First Flooring: Warm wood finishes and soft carpets enhance the feeling of homeliness while supporting a relaxed, stress-free lifestyle.

Community Benefits Enhance the Interior Experience

  • Thoughtful Common Areas: Lounges, fitness corners, and shared spaces extend the comfort of the interiors to community areas, making everyday life more enjoyable.
  • Peaceful Surroundings: Quiet, landscaped exteriors contribute to a tranquil indoor atmosphere, reinforcing the sense of calm within each unit.
  • Well-Planned Amenities: Access to amenities like lounges and meditation zones complements the interior’s relaxing and focus-friendly design.

Narra Residences Hillview sets a standard for living where comfort and functionality coexist seamlessly. By combining thoughtfully designed interiors with serene atmospheres and productivity-enhancing features, residents can experience a harmonious lifestyle that nurtures both relaxation and focus.

Read more

Discover Endless Possibilities to Refresh Your Walls with Elegant Wallpaper

Posted on September 21, 2025September 22, 2025 by Ed Miller

Walls are more than just structural elements—they are opportunities to express style and personality. Elegant wallpaper allows homeowners and designers to completely transform a space, offering depth, texture, and visual interest without major renovations. Whether you aim for a calm, serene atmosphere or a bold, dynamic statement, wallpaper provides versatile solutions to suit any taste. With countless patterns, textures, and colors available, each room can become a reflection of personal creativity. The right wallpaper not only enhances aesthetics but also creates a mood, highlights architectural features, and brings warmth to your interiors.

Why Choose Wallpaper for Your Walls

Wallpaper is more than decorative; it is a practical choice for interior design. Here’s why:

  • Variety of Styles: From subtle textures to intricate patterns, wallpaper offers endless design options.
  • Durability: High-quality wallpapers can last for years while maintaining their appearance.
  • Easy Updates: Changing wallpaper is simpler than repainting multiple times, allowing quick room refreshes.
  • Mood Enhancement: Colors and patterns influence emotions, helping create cozy, vibrant, or elegant spaces.

Types of Elegant Wallpaper to Consider

Selecting the right wallpaper depends on the desired effect and room function. Some popular styles include:

  • Textured Wallpaper: Adds depth and dimension, ideal for feature walls.
  • Floral and Nature-Inspired Designs: Bring natural beauty indoors and soften interior spaces.
  • Geometric Patterns: Offer a modern, structured look while adding visual interest.
  • Metallic or Shimmering Finishes: Reflect light and add a touch of sophistication.
  • Minimalist Styles: Perfect for creating clean, calming environments.

Wallpaper Design

Practical Tips for Installing Wallpaper

Installing wallpaper can seem challenging, but careful planning makes the process smoother. Add a touch of elegance to your interiors with wallpapers designed to inspire and transform your home, all found at https://www.demooistemuren.nl/nl/behang/elitis/. Key tips include:

  • Measure walls accurately to avoid shortages or waste.
  • Prepare surfaces by cleaning and smoothing them before application.
  • Use proper adhesive and follow manufacturer instructions for the best results.
  • Align patterns carefully, especially on walls with complex designs.
  • Consider professional help for intricate or textured wallpapers to ensure flawless finishes.

How Wallpaper Transforms a Space

Wallpaper does more than decorate; it redefines spaces. Here’s how:

  • Creates Focal Points: Bold designs or accent walls draw attention and anchor the room.
  • Enhances Perception of Space: Vertical patterns make ceilings appear taller, while light shades expand small areas.
  • Adds Character: Unique textures or designs infuse personality and style into any room.
  • Unifies Interiors: Coordinated colors and patterns create harmony across connected rooms.

Refreshing your walls with elegant wallpaper is a creative, versatile way to elevate interiors. It provides opportunities to express style, improve ambiance, and transform ordinary spaces into visually engaging environments. With the right choice of pattern, color, and texture, every room can achieve its full aesthetic potential. Whether for subtle sophistication or striking impact, wallpaper opens endless possibilities to turn walls into lasting statements of design. By exploring options thoughtfully, you can achieve interiors that are both functional and artistically captivating.

Read more

Discover How Mini Split AC Delivers Quiet and Efficient Cooling Solutions

Posted on September 16, 2025September 15, 2025 by Ed Miller

Mini split air conditioners offer an innovative way to maintain a comfortable indoor climate without the noise and energy demands of traditional systems. Designed with separate indoor and outdoor units, these systems provide precise cooling tailored to each room. Their compact design allows flexible installation in various spaces, making them ideal for homes, offices, and small commercial areas. Mini split ACs combine advanced technology with energy-efficient operation, ensuring consistent comfort while keeping electricity bills manageable. The quiet performance and user-friendly controls make them a preferred choice for modern cooling solutions.

Quiet Operation for Peaceful Comfort

Mini split ACs are known for their remarkably quiet operation. Unlike conventional window or central AC units, the indoor unit produces minimal sound, often below 30 decibels. This allows for uninterrupted sleep, work, or relaxation. The advanced compressor technology and vibration-reducing design reduce operational noise, making the cooling experience almost imperceptible. Key benefits of quiet operation:

  • Maintains a calm and serene environment
  • Ideal for bedrooms, study rooms, and offices
  • Reduces distractions during work or leisure activities

Energy Efficiency for Cost Savings

Efficiency is a major advantage of mini split systems. These units use inverter technology, which adjusts compressor speed based on the cooling demand. Unlike traditional ACs that cycle on and off, mini split ac provides consistent temperature control, reducing energy wastage. Their zoned cooling capability allows you to cool only the rooms in use, further lowering electricity consumption. Energy-saving features include:

  • Inverter technology for precise temperature control
  • Zoned cooling for targeted comfort
  • Low energy consumption without compromising performance

Flexible and Easy Installation

Mini split ACs offer flexibility in installation. The indoor units can be mounted on walls, ceilings, or floors, and require only a small hole for the connecting refrigerant lines. There is no need for extensive ductwork, which simplifies setup and reduces installation costs. This makes mini splits an excellent choice for retrofitting older buildings or adding cooling to specific rooms without major renovations. Installation advantages:

  • Minimal structural modification needed
  • Ideal for apartments, offices, and small homes
  • Quick and hassle-free setup

Smart Features for Enhanced Convenience

Modern mini split ACs come with smart controls that allow users to adjust temperature, fan speed, and modes easily. Remote controls, mobile app integration, and programmable timers enhance user convenience. Some models even include air purification filters, improving indoor air quality while keeping the space cool. Smart functionality highlights:

  • Remote and app-based control
  • Programmable settings for personalized comfort
  • Integrated air filtration for cleaner air

Mini split ACs deliver an ideal combination of quiet operation, energy efficiency, and flexible installation. Their advanced features and precise cooling capabilities make them perfect for creating comfortable indoor spaces without the drawbacks of traditional systems. By focusing on targeted comfort and cost-effective operation, mini split ACs provide a reliable and modern solution for any home or workspace.

Read more

Smart Space-Saving Tips And Freezer Storage Solutions For A Tidy, Organized

Posted on July 1, 2025June 30, 2025 by Ed Miller

Creating an organized and functional home often starts with maximizing the storage you already have, especially in the kitchen where space is often at a premium. Chest freezers and upright freezers can quickly become cluttered with random packages and forgotten leftovers. To avoid wasted space and spoiled food, start by taking inventory of what you have. Sort items into categories, such as meats, vegetables, ready-to-eat meals, and desserts. Using bins or baskets inside the freezer makes it easier to keep these categories separated, so you can find what you need without digging through piles of frozen goods. A smart approach to freezer organization involves labeling everything clearly. Use freezer-safe labels or masking tape and a permanent marker to note the contents and the date when you froze them. This simple step ensures that you can rotate older items to the front, preventing food waste and keeping your freezer running more efficiently. Grouping similar items together not only saves time but also helps you plan meals faster, reducing the number of duplicate purchases.

Chest Freezers

Flat-packing these bags saves a surprising amount of space, as they can be stacked or filed upright like books, maximizing every inch of available freezer real estate. Make use of vertical space in your freezer by installing wire racks or stackable trays. This helps prevent the dreaded avalanche effect when reaching for something on the bottom. Adjustable racks allow you to customize your freezer layout according to your needs, which is particularly useful if you frequently switch between large and small storage needs depending on the season or special occasions. Maximizing freezer space while keeping everything tidy and accessible can make a big difference in daily kitchen efficiency. Start by grouping similar items together such as meats, vegetables, or frozen snacks—so you always know where to find what you need. Using stackable, airtight containers helps maintain order while preventing freezer burn and reducing wasted space. Labeling and dating each container ensures you rotate items properly and use food before it expires.

Vertical organization also plays a key role storing flat-packed bags upright like books lets you fit more in and quickly flip through contents.  Beyond the freezer, keeping the surrounding area tidy makes a big difference in how functional your kitchen feels. Consider adding storage shelves nearby for bulk pantry items, coolers, or ice packs, which frees up more room inside the freezer itself. A small whiteboard or notepad on the freezer door can be a useful tool for keeping track of what is inside, making meal planning and grocery shopping more efficient. Finally, commit to regular maintenance. Set a reminder to clean out your freezer every few months. Discard expired or unidentifiable items, wipe down the interior, and reorganize as needed. This habit prevents overcrowding and allows you to keep an eye on any issues, like frost buildup, before they become bigger problems. With these simple strategies in silver slimline chest freezer, you can transform your freezer into a well-organized, space-saving tool that supports a tidy, functional, and stress-free home.

Read more

Top Reasons to Choose a Washer Dryer Combo for Your Laundry Needs

Posted on May 30, 2025May 29, 2025 by Ed Miller

Choosing the right appliance for your laundry needs can significantly impact your daily routine, and the washer dryer combo has emerged as an increasingly popular solution for many households. There are numerous compelling reasons why a washer dryer combo might be the perfect fit, especially if you value convenience, space efficiency, and modern technology. One of the top reasons to choose a washer dryer combo is its space-saving design. Unlike traditional setups where a washing machine and dryer occupy separate spaces, a combo unit integrates both functions into a single appliance. This is particularly beneficial for people living in apartments, small homes, or places where laundry room space is limited. With a washer dryer combo, you can enjoy full laundry capabilities without needing additional room, making it an ideal choice for urban living and compact homes. Another major advantage is the convenience of having both washing and drying functions in one machine. This eliminates the need to transfer wet clothes from the washer to a separate dryer, saving time and effort.

Washer Dryer

After starting the wash cycle, the machine automatically switches to drying mode once the wash is complete, offering a seamless laundry experience. This hands-off process can be especially helpful for busy individuals or families who want to multitask or simply avoid the hassle of moving laundry loads. Additionally, many modern washer dryer combos come equipped with advanced sensors and smart technology, allowing the machine to optimize water usage, drying time, and energy consumption. This not only improves efficiency but also helps reduce utility bills and environmental impact. Energy efficiency is another critical factor driving the popularity of washer dryer combos. Many newer models are designed to be energy efficient, utilizing less water and electricity compared to older or separate appliances. The integration of energy-saving modes and eco-friendly cycles allows users to clean and dry their clothes effectively while minimizing resource use. This makes the washer dryer combo an appealing choice for environmentally conscious consumers looking to reduce their carbon footprint.

Moreover, because it handles both washing and drying in one unit, you can often complete a full laundry cycle faster, which indirectly saves energy by reducing the total runtime of multiple machines. In terms of versatility, washer dryer combos can handle a wide range of fabrics and load sizes with customizable cycles. Whether you need a gentle wash for delicate garments or a heavy-duty cycle for work clothes and bedding, these machines offer a variety of settings tailored to different laundry needs. The drying function also typically includes options like air-dry or low-heat cycles, which are gentle on sensitive fabrics, helping to preserve the quality and longevity of your clothing. A washer dryer combo offers a blend of space efficiency, convenience, energy savings, and versatility that make it an attractive choice for many households. Whether you live in a small apartment, have limited laundry space, or simply want to streamline your laundry process, the beste wasdroogcombinatie delivers a practical and effective solution. With continual improvements in technology and design, choosing a washer dryer combo is becoming an increasingly smart investment for modern laundry needs.

Read more

Optimize Small Rooms By Using Clever And Stylish Home Decoration Concepts

Posted on May 22, 2025May 22, 2025 by Ed Miller

Maximizing the potential of small rooms requires a thoughtful blend of functionality and style. Clever and stylish home decoration concepts can transform even the tiniest spaces into comfortable, visually appealing, and highly practical areas. The key lies in using every inch wisely, selecting multi-purpose furniture, and embracing a minimal yet elegant aesthetic that does not overcrowd the space. Start by focusing on the layout. Reimagining how the room is arranged can open up hidden potential. Consider floating furniture like wall-mounted desks or shelves to free up valuable floor space. Opt for compact furniture pieces that do not overwhelm the room think sleek armless chairs, nesting tables, or a loveseat instead of a full-sized sofa. Furniture with legs can also create a feeling of openness, allowing light to flow under and around the pieces, making the room appear larger. Storage plays a crucial role in small spaces, and incorporating smart storage solutions can reduce clutter while maintaining a clean and modern look. Choose furniture with built-in storage such as ottomans that double as containers or beds with drawers underneath.

Cozy Layered Textures

Utilize vertical space by installing tall shelves or stackable storage units, which draw the eye upward and give the illusion of height. Hidden storage compartments, such as under-bed bins or pull-out cabinets, can be lifesavers in maintaining order without sacrificing design. Color choices have a dramatic impact on how a room feels. Light, neutral colors like whites, beiges, and soft grays can make a space feel airy and more expansive with best garden furniture UK. Mirrors are a well-known trick for opening up small spaces they reflect light and create the illusion of depth. Place mirrors opposite windows or light sources to maximize their effect. Strategic lighting also plays a huge role; layered lighting using floor lamps, sconces, and pendant lights helps create dimension and reduces the feeling of confinement. Textures and patterns should be used with care in small rooms. Too many bold patterns can make a space feel crowded, but a few well-placed textures such as a plush rug, a woven throw, or linen curtains can add warmth and character without overwhelming the room.

Stick to one or two accent pieces that introduce pattern or color to create a focal point and break the monotony. Finally, embrace minimalism. The fewer items you have, the more breathing space your room retains. But minimal does not mean boring adding a few personalized decor elements like framed art, indoor plants, or sculptural pieces brings life and individuality to the space. Choose items that speak to your style while keeping visual clutter at bay. In conclusion, small rooms can be just as stylish and comfortable as larger ones when designed thoughtfully. Through smart furniture selection, optimal use of light and color, and the incorporation of functional decor, it is entirely possible to create a space that feels both expansive and cozy. With the right approach, small rooms can become a perfect example of how less can indeed be more.

Read more

Unbeatable Character in Every Reclaimed Brick Slip Tile Piece

Posted on November 12, 2024November 12, 2024 by Ed Miller

Reclaimed brick slip tiles are a unique and versatile material that brings an unbeatable character to any space. Each piece, often salvaged from old buildings, walls, or chimneys, tells a story of time and craftsmanship, infusing both history and rustic charm into modern interiors. These tiles are cut from original reclaimed bricks, maintaining their authenticity while being tailored for contemporary applications. The appeal of reclaimed brick slips lies not only in their vintage aesthetic but also in their individuality no two pieces are exactly the same, making each tile a one-of-a-kind feature in any project. The character of reclaimed brick slip tiles comes from the imperfections and variations in the material. Weathering, patinas, and natural discolorations created over decades of exposure to the elements give each tile a distinct look. Some may feature deep, rich reds and browns, while others carry a more muted, worn appearance with hints of faded yellows and grays. These variations allow for a custom feel, where every wall or floor becomes a personal expression of both nature and human history.

Stylish Space

The texture of the tiles further contributes to their character, with rough, uneven surfaces adding depth and tactile interest. Incorporating reclaimed brick slips into your design not only enhances the aesthetic value of a space but also adds sustainability. By reusing old bricks, these tiles help divert waste from landfills, making them an environmentally conscious choice for eco-friendly projects. The fact that these bricks have already stood the test of time speaks volumes about their durability and strength. They are naturally weather-resistant, which means that when installed correctly, they can maintain their integrity for many years to come. This longevity makes reclaimed brick slip tiles a sound investment for both residential and commercial applications. The beauty of Reclaimed Brick Slip Tile lies in their versatility. They can be used in a range of settings, from modern industrial lofts to traditional country homes.

Whether used as a feature wall in a living room, kitchen backsplash, or even as flooring, reclaimed brick slip tiles have the ability to complement various interior design styles, including contemporary, rustic, and vintage. Their natural, earthy tones pair well with modern finishes such as polished concrete or sleek glass, creating a perfect balance between old-world charm and contemporary sophistication. Moreover, reclaimed brick slips lend themselves well to creating a sense of warmth and coziness in a space. The rich, earthy tones invoke a feeling of comfort, while their tactile surface draws attention and interest. Whether you are looking to create a bold statement or a subtle backdrop, the unbeatable character of every reclaimed brick slip tile piece ensures that your design will stand out. It is not just about aesthetic appeal; these tiles embody the spirit of history, craftsmanship, and sustainability, making them an invaluable addition to any home or business.

Read more

Posts pagination

  • 1
  • 2
  • Next

Recent Posts

  • The Seasonal Window-Cleaning Schedule Most Homeowners Wish They’d Started Sooner
  • Industrial hinges built for heavy duty use ensure lasting performance
  • Apex Community Celebrates Major Drop In Cheating Incidents Recently
  • Enjoy Seamless Instagram Video Saving With Modern Downloader Technology
  • Big Nitrous Oxide Tank Ideal for Catering Large Events

Recent Comments

No comments to show.

Archives

  • April 2026
  • March 2026
  • February 2026
  • January 2026
  • December 2025
  • November 2025
  • October 2025
  • September 2025
  • August 2025
  • July 2025
  • June 2025
  • May 2025
  • April 2025
  • March 2025
  • February 2025
  • January 2025
  • December 2024
  • November 2024
  • October 2024
  • September 2024
  • August 2024
  • July 2024
  • June 2024
  • May 2024
  • April 2024
  • March 2024
  • February 2024
  • January 2024
  • December 2023
  • November 2023
  • October 2023
  • September 2023
  • August 2023
  • July 2023
  • June 2023
  • May 2023
  • April 2023
  • March 2023
  • July 2022
  • June 2022
  • May 2022

Categories

  • Auto
  • Beauty
  • Business
  • Career
  • Casino
  • Digital Marketing
  • Education
  • Entertainment
  • Fashion
  • Finance
  • Food
  • Games
  • General
  • Health
  • Home
  • Home Improvement
  • Insurance
  • law
  • Pets
  • Real Estate
  • SEO
  • Shopping
  • Social Media
  • Sports
  • Technology
  • Travel
  • Web Design
Copyright ©2026 . All Rights Reserved | The Jo Burg